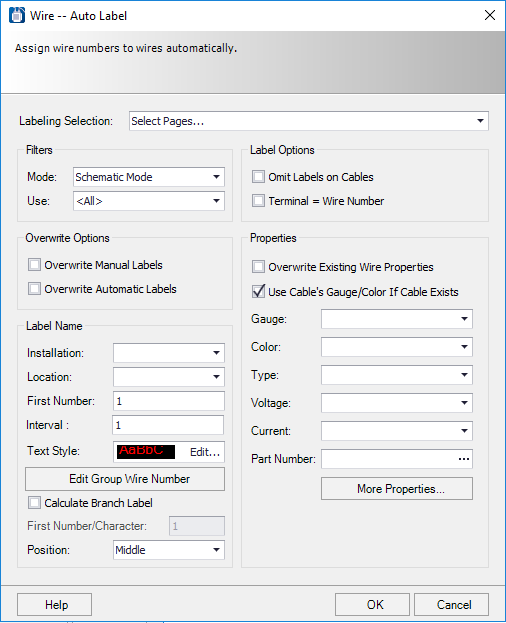
| Labeling Selection
|
In the
Labeling Selection
field, select whether you wish the new wire numbers to
apply to one of the following:
- Project: Number wires in the entire project.
- Select Pages: Number wires on selected pages (the Select
Pages dialog will open after you select
OK.
- Select Objects: Number one or more selected wires on the
current page.
|
| Filters
|
In the
Filters area, use the
Mode field to select the drawing mode in
which the wires (or pneumatic lines, etc.) will be numbered. The
Use field is used in conjunction with the
wire layers defined in the wire options mode. You can select
<All> to number wires on all layers,
or select a single layer on which wire numbering will be performed.
|
| Label Options
|
In the
Label Options
area, the
Omit Labels On Cables check box causes the
software to skip any wire branches that are designated as a conductor of a
cable so that they do not get a label. The wires connected to the cable will
still receive labels. Select the
Terminal = Wire Number check box if you wish
to renumber any terminal on a wire with the assigned wire number.
|
| Overwrite Options
|
In the
Overwrite Options area, you can choose
whether or not the new wire numbers will overwrite any existing wire numbers.
You can choose to overwrite manually assigned wire numbers (
Overwrite Manual Labels), automatically
assigned wire numbers (Overwrite Automatic Labels), or
both.
|
| Label Name
|
In the Label Name area
select elements that will comprise the wire label.
- Installation -
Select an existing installation from the drop down to include in the label name
if desired.
- Location - Select a
location from the drop down to include in the label name if desired.
- First Number - Set
the value at which the sequential numbering will begin. If no value is entered,
numbering will start with 1.
- Interval - The
interval field lets you set the interval at which the sequential numbers will
be assigned. Working in conjunction with the Start Number you have the
flexibility to specify even and odd number wire numbering schemes when
automatically assigning wire numbers to selected pages.
- Text Style - This
field lets you set the font name, size and other attributes of the wire labels
(use the
Edit button to make changes).
- Calculate Branch
Label - Enable this check box if you wish the software to calculate unique
numbers for each wire branch.
- First
Number/Character - Lets you can specify the first number (or letter) when
calculating a Branch Label.
Note: To include
branch numbers in the displayed wire number you must also include the Branch #
variable in your wire number format settings.
- Position - Select
where the wire number will appear on the wire segment. (Left or
Top,
Middle or Right,
Bottom)
The
Edit Group Wire Number button allows you
to modify the prefix and/or suffix on a selected group of wires. These are
similar to the settings you can make in the project options wire options which
apply globally. When you select the button, the
Edit Prefix/Suffix dialog appears.
Make the desired prefix or suffix settings. You must
make settings for all of the wire types. Select the
Same as Option
check box if you wish to use the wire labeling
defined in the project options for that wire type. When you click in the
Numbering Profile field, a browse button
will appear, allowing you to select one of the existing wire numbering
profiles. Enter any desired prefixes or suffixes in the
Prefix or
Suffix fields. Select
OK to return to the
Automatic Wire Number
dialog.
|
| Properties
|
In the
Properties area you can assign various
wire parameters. In order to assign these properties you must first select the
Overwrite Existing Wire Properties check
box; then the various properties fields will become active. (If you do not
select the check-box, the properties that are already assigned to the wires
will be used.) The
Gauge field allows a wire gauge (size)
value to be assigned which will be associated with the wires. The
Color field allows a wire color to be
assigned which will be associated with the wires. The
Type field allows you to select from a
list of wire types (bare copper, tinned copper, etc.) or enter your own
description. The
Voltage and
Current fields allow you to enter
electrical values for the wire. The
Part Number
field allows you to assign a part number to be associated
with the wires.
Note: If a wire
property (gauge, color, etc.) for a specific wire has no value, it is not
considered an existing property. Therefore, if you enter a new property value
it will be assigned to wires that currently have no value even if the
Overwrite Existing Wire Properties check
box is not selected (provided that those wires are selected for wire number
assignment). For example, suppose wire number 100 starts with these properties:
Gauge: 14, Color: RED, Voltage: (blank). You then enter these properties:
Gauge: 12, Color: BLK, Voltage: 120 and run wire numbering without selecting
the Overwrite Existing Wire Properties check-box. As a result, wire 100 will
have these properties: Gauge: 14, Color: RED, Voltage: 120 (only the voltage
property was assigned).
If you select the
Use Cable's Gauge/Color If Cable Exists
check box, any gauge or color values that are assigned to a cable through its
device family will be retained.
By selecting the
More Properties button the software will
display a dialog containing ten additional property fields that the user can
assign. If a wire already has a property value assigned it should never be
overwritten by the auto label function.
Enter any additional properties you wish to
associate with the wire and select
OK.
Select
OK in the
Auto Label dialog to execute the
automatic wire number assignment.
|
 Used to automatically assign
numbers to wires and other logical lines.
Used to automatically assign
numbers to wires and other logical lines.